
You can light an interview beautifully and frame it like a magazine cover, and viewers will still click away in seconds if they can't comfortably hear the answer. Dialogue is the deliverable in an interview, and a wireless lavalier — the little clip-on microphone that rides on the subject's chest — is how you capture it close, clean, and consistent. The gear is the easy part. The craft is in placement, levels, and giving yourself a safety net. Get those three right and your audio sounds professional regardless of which mic is on the shelf.
What a wireless lav setup is
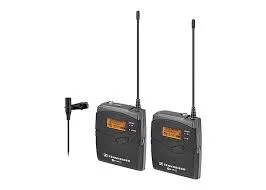
A wireless lavalier kit is three pieces working together: a small microphone, a transmitter that clips to the subject (often the size of a deck of cards) and sends the audio over radio, and a receiver that picks it up and feeds your camera or recorder. Because the mic sits a few inches from the mouth, it captures the voice far louder than the room — which is exactly what you want for clear, intimate dialogue.
The interview audio chain
- Microphone
- Lavalier — clipped near the chest, close to the voice
- Transmitter
- Worn by the subject; sends audio wirelessly
- Receiver
- Feeds the camera or a field recorder
- Recorder
- Optional dedicated box for isolated, higher-quality tracks
- Backup
- A second mic (on-camera or boom) as a scratch/
safety track - Monitoring
- Closed-back reference headphones, on the whole time
You can run the receiver straight into a camera for a simple setup, or into a dedicated recorder like the Zoom F6 for isolated tracks and the safety of 32-bit float. Either way, the techniques below matter more to the final sound than the brand on the box.
The craft that makes it sound good
Placement: high, centered, and close
Clip the lav on the centerline of the chest — over the sternum, around the second shirt button — and as high as you can while staying out of frame. Centered matters because people turn their heads when they talk; if the mic is off to one side, the voice gets louder and softer as they look around. Higher and closer to the mouth means a stronger, more present voice and less room. A few inches of placement is the single biggest lever you have over how the recording sounds.
Hiding it, and killing clothing noise
A visible mic isn't wrong, but a hidden one looks cleaner on camera. Run the cable under the shirt and clip the capsule just below the collar, or tuck it behind a placket. The enemy of a hidden lav is clothing rustle — fabric brushing the mic every time the subject moves. Mount the mic so the capsule isn't pressed against shifting fabric, secure the cable so it can't slide, and avoid stiff or noisy materials over the mic. Ask the subject to settle into their posture before you start; a lav that's quiet when they're still but rustles when they gesture usually just needs the cable anchored.
Levels: leave yourself headroom
Set your level so normal speech sits comfortably below the top of the meter — you want headroom for the moment your subject laughs, gets excited, and suddenly doubles in volume. If the loud peaks slam into the ceiling, they clip and distort permanently, and that can't be fixed afterward. It's always safer to record a touch quiet and raise it later than to record too hot and lose the peaks. (This is exactly the problem 32-bit float recorders are built to make forgiving — but good level discipline still matters on any rig.)
Monitor with your ears, the whole time
Wear closed-back reference headphones and actually listen — not just at the start, but throughout. Headphones are how you catch the problems a meter won't show you: a loose connection crackling, a wireless dropout, an air vent humming, a bracelet clicking against the transmitter. Five seconds of listening before the first real question saves you from discovering a dead mic in the edit. Reference cans like the Sennheiser HD 650 let you hear those issues clearly enough to fix them on the spot.
Always record a backup
The one rule that separates people who never lose an interview from people who eventually do: capture a second, independent audio source as a safety track. Wireless can drop out, a battery can die, a clip can slip mid-answer — and your subject won't say it as well the second time. A simple on-camera shotgun rolling alongside the lav, or a boom overhead, gives you a fallback that's already in sync with the picture.
That backup can be modest. A compact on-camera mic like the Rode VideoMic Pro Compact picks up a usable scratch track of the whole room. A short shotgun like the Azden SMX-30 does the same with a tighter, more directional pickup. The point isn't which one; it's that you never roll an interview on a single point of failure.
When to rent it
Interview audio is occasional for most shooters, and wireless gear and headphones sit unused between shoots — so renting the kit per job makes sense. Renting wins when:
- The shoot is dialogue-driven — testimonials, founder stories, talking-head or panel content.
- You need more than one mic — two subjects, or a lav plus a backup, captured cleanly.
- You shoot sound rarely — a wireless kit, a backup mic, and reference headphones a few times a year doesn't justify buying them.
- You're already booking the room — add the kit to a studio interview day and record in a quiet, controlled space.
We rent the Wireless Lavalier Kit alongside the backup mics and Sennheiser HD 650 reference headphones, so you can assemble a complete dialogue chain — primary, safety track, and monitoring — from one accessory shelf.